A concept portrait shoot with Joanna Bordon
Background
I returned from the Society of Wedding and Portrait Photographer's convension in January '15 with a number of ideas to try out lighting wise. Coupled to this was a desire to nail a couple of other techniques that I had tried before and not quite hit the mark. Someone I had worked with before said she was available to model for me, because hours before the shoot something else came up.
Instead of throwing in the towel, I contacted Kit King and Joanna Bordon and asked them to help out if they were free. I had a suspicion they could be as they are students and last week was a reading week and I was working with them the next day for a dance shoot at the Northern School of Contemporary Dance. They were free so we got together and this is what transpired.
The shoot
I had listened to and seen a photographer called Larry Lourcey from Houston, Texas take similar shots to the following during a class (entitled 'Impacted portraiture') and liked the look. There is so much mediocre photography that passes for a professional standard around. It is refreshing to be inspired by someone and others who excel at portrait photography.
The best things about the look is it only requires a single light source. In this case a strip box (a long rectangular softbox). The box is placed in such a way the light from it skims one side of the models face and the photographer shoot from the other side (see photograph 1). This lights the far side of the model's face and acts as a hair light too. Lighting the hair means there is separation between it and the background. Gaining control over Jo's naturally curly hair proved a minor comic challenge throughout the shoot. It seems to have a will of its own.
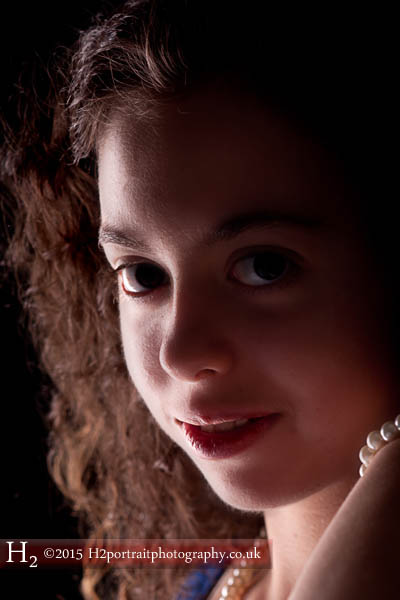
1. A single light source was placed to the side of Jo's face. You can it's reflection in the far eye. The shadow on the near cheek is a result of the light reflecting off the wrist. The faux pearls add a bit of interest to the photograph. Please note the subtle catch light in the near eye that prevents it from being lost in the shadow. 1/125s, f/7.1, ISO 200 and 85 mm.
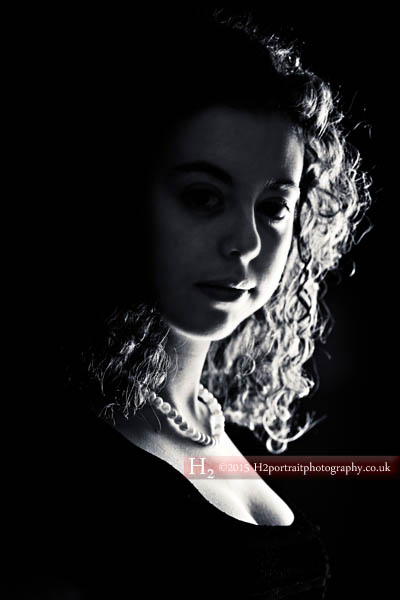
2. The same lighting set up as before, but from the other side. Using the modelling light, I moved around until I could see a fine rim of light tracing or sculpting the outline of Jo's nose. This stops it being lost in the shadows. It is also important to be able to see detail on the dark side of her face too. 1/125s, f/5, ISO 200 and 85mm.
When you have hair as voluminous as Jo's a photographer would be daft not to utilise it hence why the hair is lit to bring out the curls. Jo mentioned she will only let certain hairdressers cut her hair because it takes a certain know how to cut and style hair of this kind.
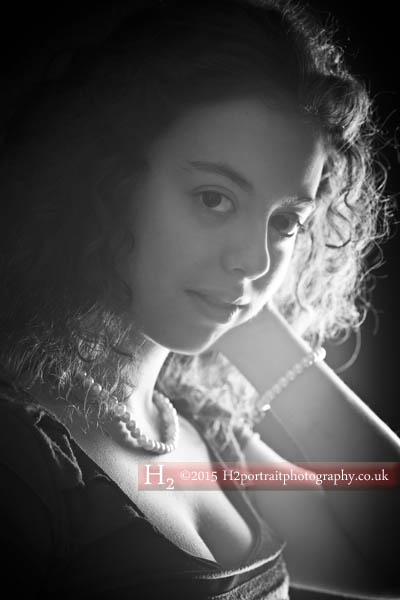
3. Kit reflected a bit of light back into the dark side of Jo's face using a white reflector. Otherwise there was no change to the camera's or lighting settings. Her forearm creates a small triangle and a leading line to her face. I also like the way the light catches the pleats of her dress.

4. Here the aperture is f/7.1 to reduce the amount of light hitting the far side of Jo's face. Again, I was looking for a rim of light around edge of the nose. This time Jo pulled some shapes to frame her face. The pearl necklace stops her neck from disappearing into the darkness. If you look really hard you can make out the detail on the dark side.
You can change to the look and feel of a shot just be opening or closing the aperture by small amounts. This lets more or less light into the camera.
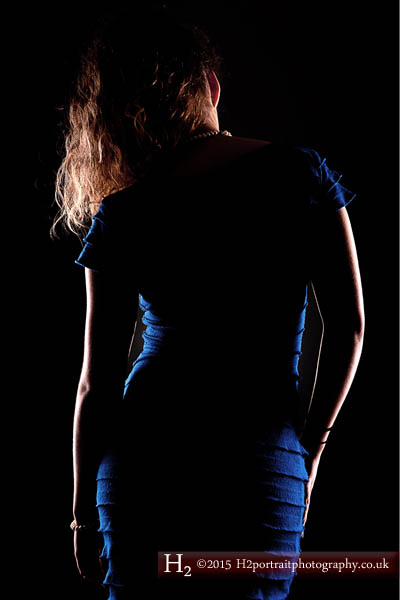
5. This shot has eluded me for a while. I saw another photographer create this look and wanted to something similar. Previous attempts were close, but had 'wonky' elements. This is what I was after. Just enough light to bring out the shape of Jo's body and the gaps between her arms and waist. By pulling the hair to one side, dropping a shoulder and an arm, it creates asymmetry and pulls the 'energy' to the left. 1/125s, f/7.1, ISO 200 and 50mm.
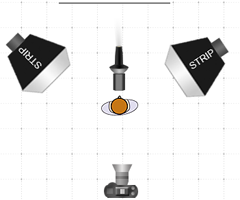
The above photographs was taken with three strobes. Two (fitted with vertical strip boxes) either side of body and angled to form an apex where the camera is situated. Another is placed in front of model with a snoot fit with a large hole and grid. This created the small hints of light in the gaps between arms and the waist. It is good feeling to nail a shot that you have admired for a number of years.

6. The shot below uses the same lighting set up. It was Jo's idea to lift up her hair. The pleats of the dress help break up the curves a bit. By changing the orientation of the model and camera's position you can create different look without altering the lighting or settings. 1/125s, f/7.1, ISO 200 and 85mm.
It has been a belief of mine (that has been backed-up by other far more season photographers than I) that dancers make the best models. Why? Because they know how to pull and create pleasing shapes. They are very creative and know how to look elegant. All you have to do is teach them a few of the nuances of posing and BOOM! A perfect model!
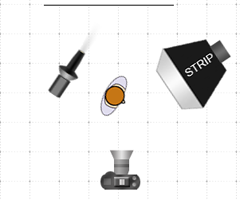
In the next shot (7), I explained to Jo what I was after and gave her a crude demonstration. She took that and came up with the next pose. It was then my job to light it. The first few shots employed only one light. After showing Kit we agreed it needed a second. He moved it around until it created a small and subtle pool of light between the small of the back the arms. It created the shot of the day. It was the collaboration between the three of us.
The lighting is just a tweak from the initial set up and idea that Larry Lourcey showed me at the convention.
If you ever work with me either, because you have hired me or we are working on a concept shoot, I welcome input from you and others to improve the shot. This is particular true if you yourself are a creative person or artist. In the majority of cases, the end results are significantly better than drawing from one pool of experience alone.
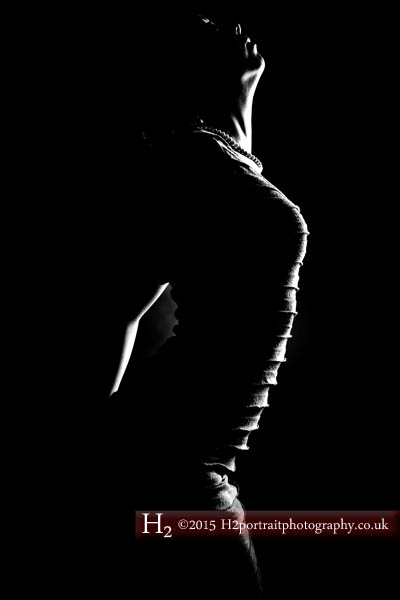
7. A strip box was placed on the right of the photo angled in such a way to create a kiss of light across the Jo's body and leading edges. I had Kit (on the left of the shot) angle a strobe with snoot and a grid to create a small pool of light between the small of the back and the arms. Jo came up with the pose. Please note the triangle shaped lick of light on her neck with the corresponding shadow. We all love this shot. 1/125s, f/8, ISO 200 and 50mm.
To end, I sat Jo in a chair, draped her in a piece of very fluffy cloth (the type that you could die for) and lit her with a spotlight. All of this was so I could make her look like a Hollywood star from the early to mid part of the twentieth century. See photograph 8. I would have taken a few more, but we were pushed for time and I wanted to show them the photographs and how I work post processing wise.
Post processing
Most of the post processing involved a bit of cropping, tilting, adjusting the exposure and ensuring the background was an even black. I try to do the majority of the hard work at the moment the photograph is taken rather than sat behind a computer. (This is something else I learnt from the top pros.) A bit of 'dodging' was used to bring out the details of the rim lighting. I use Lightroom for to make changes to the whole or large parts of the photograph and then Photoshop for more the delicate work. This includes smoothing out skin and bringing out the detail in the hair.
Technical details
A full-frame camera with an 85mm f/1.8 (my favourite lens) and 24-70mm f/2.8 lens was used throughout. I could have used a 50mm f/1.8 instead of the latter.
The camera in manual mode throughout. I metered the lights before Jo and Kit came over and then worked from there. The meter was placed towards the light. I then tweaked the aperture according to the look/mood I wanted.
A large white reflector was used in some of the shots to add a hint of light to the far side of Jo's face.
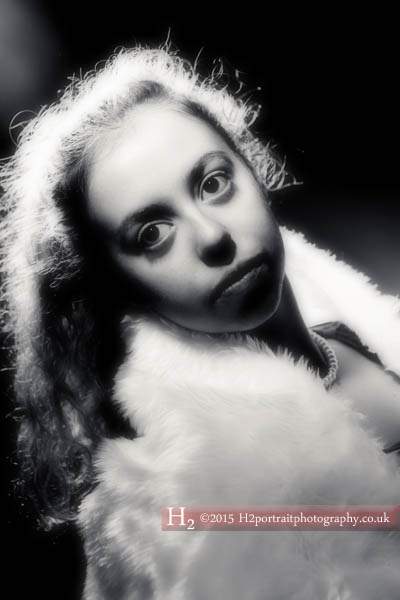
8. Just to finish the shoot off. I made Jo look like an actress from the Golden Age of Hollywood. Two lights, one straight down her nose (a Lupolux 800 HDMI spotlight) and another normal studio strobe on low power skimmed the top of her hair to create the halo and the highlights on the back wall. This also had a 30 degree honeycomb grid fitted to control the spill. A bit of work in Photoshop and voila! Jo like you have never seen her before. 1/125s, f/5.6, ISO 200 and 70mm.
Final thoughts and thanks
For a last minute shoot the results were beyond what I could have hoped for. This is part is due to Jo looking amazing and Kit helping out when and wherever required. He also gave me a lot of helpful feedback on the photographs when they were shown on the back of the camera. In some cases, it took the two of use to bring Jo's hair under momentary control. I hope you both had an fun and wonderful time. It sure beat sitting at home in an otherwise empty house. I bet you were not expecting the photographs to come out like this.
Trying to stop Jo from laughing and smiling too much was a real challenge. She would look at Kit and start laughing, stop compose herself and then got the giggles again when she gazed at me! What can you do? Some people just cannot help but smile and laugh. The world is a happier and more pleasent place when they are around.
See the follow-up dance and movement blog and photographs featuring Joanna, Kit and lovely Erica! OH YEAH!
Booking a photo shoot
If you would like to book a shoot contact me.
Your thoughts

Please leave any thoughts, comments, questions or just say, "Hi!" (not literally) below. I really do appreciate feedback. E.g. What is your favourite photograph and why?
A few more photos on Facebook.